Add Network to MetaMask: Easy Step-by-Step Guide
So, you've got MetaMask set up, but you're only interacting with the Ethereum mainnet. If that's the case, you're essentially exploring just one city in the massive, sprawling world of Web3. To really unlock what's possible, you need to start adding custom networks.
Think of it this way: your wallet is your passport. Sticking only to Ethereum is like never leaving your home country. By adding networks like Polygon, Avalanche, or BNB Smart Chain, you're stamping that passport and opening up a universe of new apps, cheaper fees, and lightning-fast transactions.
Why Bother Adding More Networks?
The crypto world is way bigger than just Ethereum. New and exciting projects are constantly popping up on other blockchains, often because they can offer users better speed and much lower costs. It's a true multi-chain ecosystem out there.
Getting comfortable adding new networks opens up a whole new game. You suddenly get:
- Cheaper Gas Fees: Tired of paying a fortune just to mint an NFT or make a simple swap on a DEX? Many other chains have transaction costs that are a tiny fraction of what you'd pay on Ethereum during peak times.
- A World of New dApps: Some of the most interesting DeFi platforms, blockchain games, and NFT projects aren't on Ethereum at all. They're built exclusively on other networks, and you need to add them manually to get in on the action.
- Seriously Fast Transactions: If you're trading or trying to get into a new token launch, speed matters. Alternative networks often provide much quicker confirmation times, so you aren't left waiting around.
MetaMask isn't just an Ethereum wallet anymore; it's designed to be your hub for everything Web3. It has evolved into a powerful multi-chain gateway, and its entire interface is built to help you manage your assets across all these different ecosystems from one place.
This multi-chain capability is exactly why MetaMask has become so popular, attracting around 30 million monthly active users who need a single, secure wallet for all their crypto adventures. You can dig into the specifics of MetaMask's explosive growth on coinlaw.io. When you start adding more networks, you're simply using the wallet for what it was truly designed to do.
To give you a better idea of what's out there, let's look at some of the most common networks people add to their MetaMask wallets.
Popular Networks You Can Add to MetaMask
Here's a quick look at some of the most popular blockchain networks, what they're used for, and the main advantage of adding them to your wallet.
| Network Name | Primary Use Case | Key Benefit |
|---|---|---|
| Polygon (MATIC) | Scaling Ethereum, DeFi, Gaming | Very low gas fees and fast transactions |
| BNB Smart Chain (BSC) | DeFi, dApps, Token Swapping | Large ecosystem with low transaction costs |
| Avalanche (AVAX) | DeFi, Enterprise Blockchains | Blazing-fast transaction finality |
| Arbitrum | Ethereum Layer-2 Scaling | Ultra-low fees while inheriting Ethereum's security |
| Optimism | Ethereum Layer-2 Scaling | Fast, stable, and cheap transactions for dApps |
This is just a small sample, of course. The beauty of MetaMask is that you can add virtually any EVM-compatible network, giving you an incredible amount of freedom to explore.
Finding the Right Network Details Safely
Before you can add a new network to MetaMask, you have to get the right connection details. This stuff is critical—think of it as the specific address and password for that blockchain. Get one character wrong, and it simply won't connect. Worse, you could open yourself up to a malicious network designed to snoop on your activity.
That's why where you get this information from is non-negotiable.
Where to Look and What to Look For
Your first and best bet should always be the official documentation for the blockchain project. Go straight to the source. The project's own website or its developer portal will have the most accurate and secure RPC URL, Chain ID, and other settings you need.
Steer clear of details you find in random social media posts or sketchy tutorials. Phishing scams love to use fake network details to try and intercept your data.
A fantastic, community-trusted resource for this is Chainlist. It’s basically a big, curated list of EVM networks that makes finding and adding them a breeze. You can search for a network and often add it automatically, but it’s also the perfect place to just grab the correct info to enter manually.
Here's what you'll see on Chainlist when you search for a network like Polygon or Arbitrum.
As you can see, it lays out all the key details—like the Chain ID and Currency Symbol—in a clean, easy-to-read format.
My Two Cents: Always, always double-check the URL of any site you're using, including Chainlist. Scammers are experts at creating convincing clones to trick you. Stick to official project sites and well-known tools.
It also helps to know what these details actually do. The Chain ID, for example, is a unique number that stops MetaMask from getting confused and accidentally replaying a transaction meant for one network on another (like sending a Polygon transaction to the BNB Smart Chain).
Getting these details right is fundamental for security. It's also sometimes used to figure out who's eligible for token distributions, which you can learn more about in our guide on how an airdrop works. Taking a few extra seconds to verify your sources is a small price to pay for protecting your assets.
Adding a Network Manually: A Hands-On Guide
Sometimes, you need to get under the hood and add a network yourself. While many dApps can add networks for you, knowing the manual process gives you more control and a much better feel for how your wallet actually connects to different blockchains. It’s a fundamental skill every crypto user should have.
For this walkthrough, we’ll use a super common example: adding the Polygon (Matic) network. It's a go-to for many people thanks to its low fees and quick transaction times, making it the perfect network to practice on.
Finding Where to Add the Network
First things first, pop open your MetaMask extension. In the top-left corner, you'll see a dropdown that likely says "Ethereum Mainnet." Click it. A list of your current networks will appear.
Scroll all the way to the bottom of that list and you'll spot an "Add network" button. Go ahead and click that. This is your gateway to the configuration form.
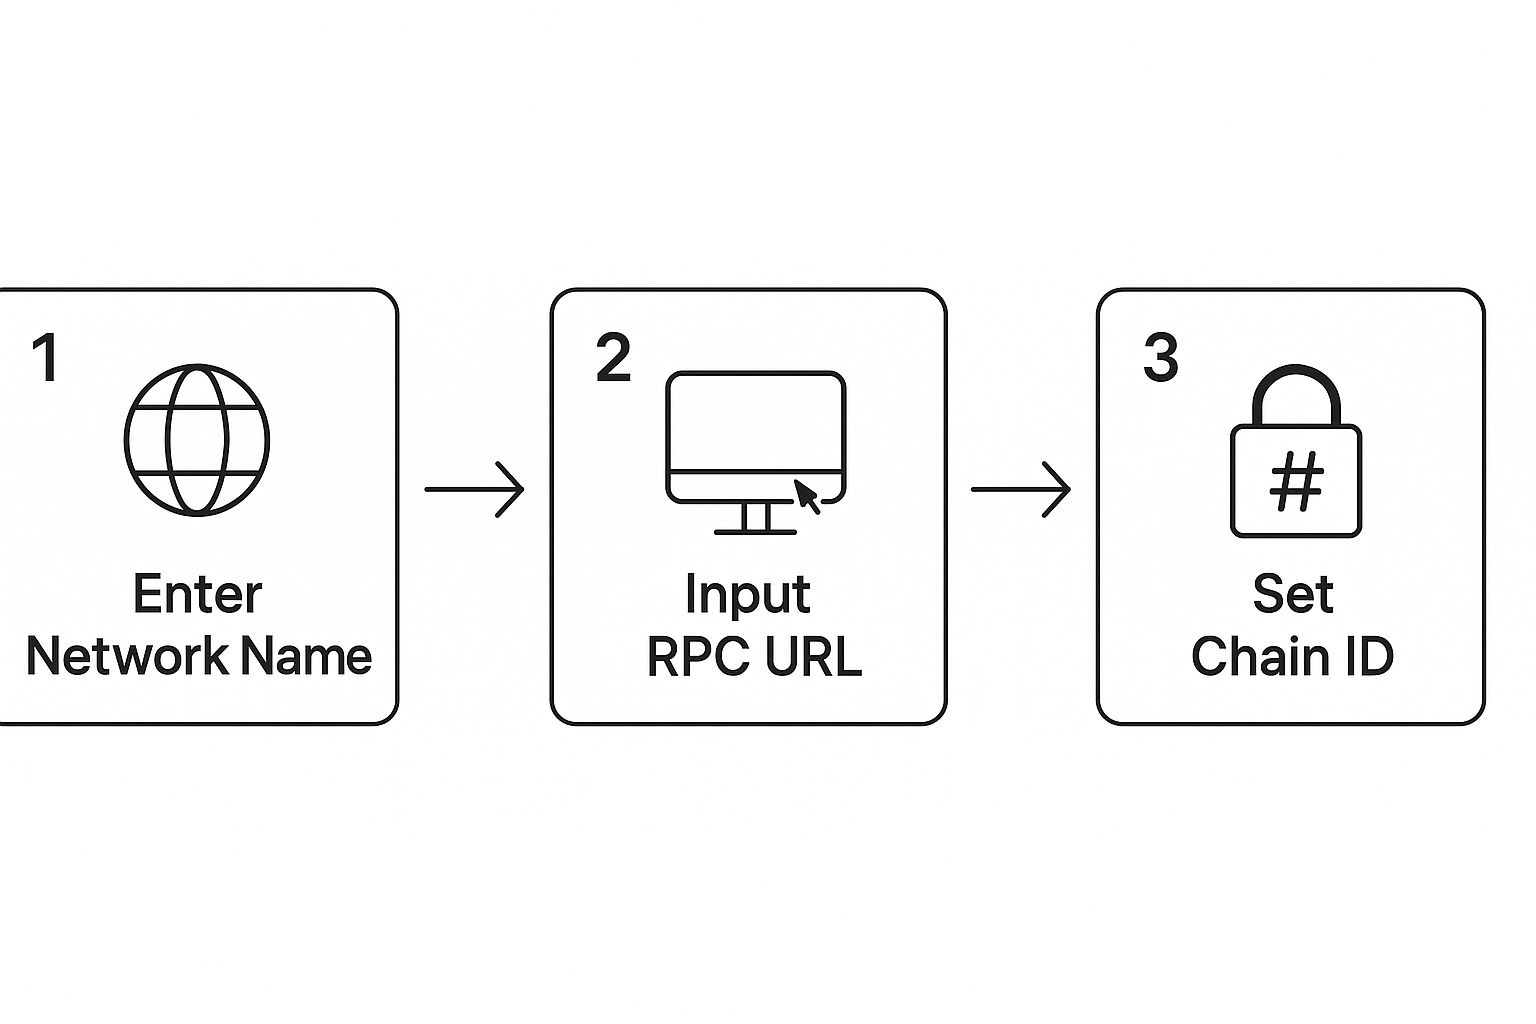
You’ll see a form asking for five pieces of information. It looks technical, but don't sweat it. Finding these details is easy, and I'll give you exactly what you need for Polygon.
Plugging in the Polygon Network Details
Now for the important part: filling in the network info. You always want to get these details from an official source, like the network's own documentation. Using bad info won't just fail to connect—it could potentially expose you to security risks.
Here are the official settings for the Polygon Mainnet:
- Network Name: Polygon Mainnet
- New RPC URL:
https://polygon-rpc.com - Chain ID:
137 - Currency Symbol:
MATIC - Block Explorer URL (Optional):
https://polygonscan.com
Take a second to double-check every field before you save, especially the Chain ID. A typo is the most common reason a custom network fails to connect.
My Two Cents: Don't skip the Block Explorer URL. It’s marked as optional, but it's a lifesaver. It lets you click on any transaction hash right from your MetaMask activity log and jump straight to Polygonscan to see all the details. Incredibly useful.
Once you hit "Save," MetaMask will instantly switch you over to the Polygon Mainnet. You’ll see your balance change to 0 MATIC, and the network selector will now proudly display "Polygon Mainnet."
That's it! You've just unlocked a new blockchain for your wallet. This same process works for almost any EVM-compatible chain out there. Now you're all set for things like a free NFT mint, which almost always happens on Layer-2 networks like Polygon to keep those gas fees down.
MetaMask Isn't Just for Ethereum Anymore
For the longest time, we all thought of MetaMask as the Ethereum wallet. That's changing, and fast. It's quickly becoming a true multi-chain hub, which is a massive deal for anyone navigating the Web3 world. Instead of juggling a half-dozen different wallets for different chains, we’re moving toward a future where one familiar interface can handle it all.
This all started to click when MetaMask began integrating non-EVM chains. Think about it—just a little while ago, if you wanted to play around on a network like Solana, you had to download a whole new wallet. It was a pain, splitting your assets and overcomplicating everything. MetaMask is finally starting to bridge that gap.
Stepping Into New Territories
Bringing fundamentally different blockchains into the fold is a huge leap. It’s making it so much simpler to manage assets across different ecosystems, which means less time spent switching between wallets and more time actually using dApps.
This shot from Solana's official site gives you a peek into the vibrant world that’s opening up right inside MetaMask.
What this really means is you can dive into all those fast-growing DeFi and NFT projects on Solana without ever leaving the wallet you already know and trust.
The introduction of Solana support was a turning point. It finally allowed people to send, receive, and interact with SPL tokens and dApps directly from their MetaMask wallet. This isn't just about convenience; it helps cut down on the risks that come with using external bridges, which have been a major target for hacks. You can find some great insights on this multi-chain wallet evolution over on Binance.
It's hard to overstate how much this simplifies cross-chain activity. Instead of hopping between chains with risky third-party bridges, you can manage everything from a single, secure spot. This whole "super wallet" trend is making Web3 safer and a lot less intimidating.
As MetaMask continues to add network support to metamask, it's really cementing its place as the go-to portal for everything Web3. For those of us who like to get our hands dirty, knowing how to validate contract states on any EVM chain becomes an even more critical skill in this new multi-chain reality.
Alright, let's get this sorted. Even when you've done everything by the book, sometimes MetaMask just decides to have a bad day. If you've hit a roadblock trying to add a new network, don't sweat it. This is a super common hiccup, and the fix is usually surprisingly simple.
Nine times out of ten, the problem is a sneaky little typo. A single wrong letter in the RPC URL or a mixed-up number in the Chain ID is all it takes to grind everything to a halt. Seriously, before you dive into any complex troubleshooting, just double-check what you entered against the official network details.
The Quick Fix Checklist
If a careful copy-paste didn't do the trick, let's run through the usual suspects. I've personally run into every single one of these at some point.
- Getting a "Could not fetch chain ID" error? This is the classic sign of a bad RPC URL. Either you've got a typo, or the server itself is down. Your best bet is to find an alternative RPC endpoint from the project's official docs and try that one instead.
- Transactions getting stuck or failing? If the network is connected but nothing's going through, you're likely hitting a congested RPC server. Think of it like a traffic jam. Finding and switching to a different public RPC often clears this right up.
- Is the connection just...flaky? Don't overlook the obvious! Your own internet connection could be the culprit. A quick Wi-Fi toggle or a browser refresh can sometimes work wonders.
Key Takeaway: Errors like these are almost never about your funds being in danger. It's just a communication breakdown between your wallet and the network. A simple configuration or connection issue.
And if all else fails? The age-old IT advice holds true: try clearing your browser cache or just giving the browser a full restart. You'd be amazed how often that solves the most stubborn problems.
Frequently Asked Questions
Still have a few things on your mind? You're definitely not the only one. Let's tackle some of the most common questions people have when they add a network to MetaMask. The goal here is to clear up any confusion so you can use your wallet like a pro.
Is It Safe to Add Just Any Custom Network?
The process of adding a network is safe, but the information you use is what really matters. You have to be super careful about where you get the network details.
My advice? Stick to official project websites or trusted sources like Chainlist for RPC information. Plugging in a malicious RPC URL could potentially expose your IP address or transaction data to someone you don't want having it.
Key Takeaway: Adding the network isn't the risky part—it's the source of the network info. Always double-check that you're getting the details from a legitimate place before hitting save. Your security depends on it.
How Do I Switch Between Networks?
Flipping between networks is a breeze. Just look at the top of your MetaMask wallet, and you'll see a dropdown menu that probably says "Ethereum Mainnet." Give that a click.
A list of all the networks you've added will pop up. Just select the one you need, and MetaMask will switch over instantly. Easy as that.
What Happens If I Mess Up and Enter the Wrong Info?
Don't worry, we've all done it. If you enter an incorrect Chain ID or a bad RPC URL, MetaMask will likely throw an error message at you, something like "Could not fetch chain ID." In other cases, it just won't connect.
The good news is that your funds are not at risk from a simple typo.
Here's how to fix it:
- Head over to Settings > Networks.
- Find and click on the network you added incorrectly.
- Just hit the 'Delete' button to get rid of it.
Once it's gone, you can try adding the network to MetaMask again with the right details.
Can I Remove a Network I Don't Use Anymore?
Of course! It's smart to keep your network list tidy. To remove one, just navigate back to Settings, then click on the Networks tab. You'll see every custom network you've ever added.
Find the one you want to delete, click on it, and hit the 'Delete' button. It'll be gone for good.
Ready to grow your Web3 community without the manual grind? At Domino, we provide the no-code tools to launch and automate reward-based quests that drive real engagement. Discover how you can accelerate user acquisition today.